Installing Ceiling Fan Light Kit - How to Install a Wireless Remote for a Ceiling Fan ... - The wiring is now complete.. Installation and save these instructions. Applicable for your light kit. Install ceiling fan with light kit. The light kit uses one medium base 12 watt led bulb (included). Once these wires are securely connected, push them into the junction box.
Use a circuit tester to verify that the power is off. Otherwise, remove the ceiling fan and place on a tabletop to install the light kit. This light is designed to complement the calera ceiling fan, but is compatible with most light kit adaptable ceiling fans. Once these wires are securely connected, push them into the junction box. Step by step instructions for assembling and installing a ceiling fan with light kit.in this video i remove and old ceiling fan and replace it with a new ham.
How to Install a Hunter Low Profile Ceiling Fan - 5xxxx ... from i.ytimg.com Use wire cutters to cut the wires if they can't fit into the box. Branch power from existing circuit. Connect the light kit to the bottom of the switch housing with the light kit screws that came with the ceiling fan. Disconnect the blue wire and the white wire connecting the light kit and the switch housing. This light kit is also energy star rated for increased efficiency and energy cost savings. If there are three or more wires to connect or any of the wires is larger than 18 gauges, consult an electrician for the proper size wire connectors to use. Loosen the two screws in the collar on top of the motor. Installation and save these instructions.
Remove the switch housing cover plate from the fan, and remove the plug from the center of the plate.
Please note that installing the light kit may vary depending on your ceiling fan with lights. Connect the light kit to the bottom of the switch housing with the light kit screws that came with the ceiling fan. If the swag kit does not have the wire already threaded through the chain, you will have to manually do it. We will advise that you purchase a ceiling fan light kit that is compatible with the ceiling fan you have. If there is no light kit, the fan should do a ¼ turn back and forth and then begin spinning. The source is at the switches and the input of each is spliced to the black source wire with a wire nut. Lift the ceiling fan and hang it on the hanging bracket. Install a bulb in each of the light sockets. Unscrew any screws in this area and pull off any decorative plates or covers that are concealing light attachment points and wires. It's held in by three screws on the side of the housing. On the bottom of her fan, a small cover holds the wiring harness in place. Ceiling fan installation labor, basic basic labor to install ceiling fan with favorable site conditions. Applicable for your light kit.
Install the bulbs (d) into the sockets on the light kit (a). Disassemble the light kit from the ceiling fan by removing the two light kit screws. Ceiling fan with light kit wiring diagram. Do not install as a light fixture. A ceiling fan light kit.
Oil Rubbed Bronze 42" Ceiling Fan w/ Light Kit from ep.yimg.com Connect the red wire in the ceiling to the black wire in the light kit and the black wire in the ceiling to the black wire in the fan. The source is at the switches and the input of each is spliced to the black source wire with a wire nut. Use wire cutters to cut the wires if they can't fit into the box. · to reduce the risk of electrical shock, install this light kit only on listed hunter ceiling fans type a through z. Then remove the finial (c), finial cap (b), nut (g) and rubber washer (f) from the light kit (a). Applicable for your light kit. Tuck the wires back into the box. Once the ceiling fan is installed, follow these steps to pair with a wall control:
Once the ceiling fan is installed, follow these steps to pair with a wall control:
Most manufacturers have universal light kits that go with any ceiling fan from the same manufacturer. Ceiling fan installation labor, basic basic labor to install ceiling fan with favorable site conditions. This light kit is also energy star rated for increased efficiency and energy cost savings. If there is no light kit, the fan should do a ¼ turn back and forth and then begin spinning. Connect the light kit to the bottom of the switch housing with the light kit screws that came with the ceiling fan. On the bottom of her fan, a small cover holds the wiring harness in place. Applicable for your light kit. Cautions · to avoid possible electrical shock, before installing light fixtures, disconnect power Install the bulbs (d) into the sockets on the light kit (a). The source is at the switches and the input of each is spliced to the black source wire with a wire nut. Carefully remove the screws from the decorative cover ensuring you keep track of all the items by placing them in a safe spot. Then remove the finial (c), finial cap (b), nut (g) and rubber washer (f) from the light kit (a). Unscrew any screws in this area and pull off any decorative plates or covers that are concealing light attachment points and wires.
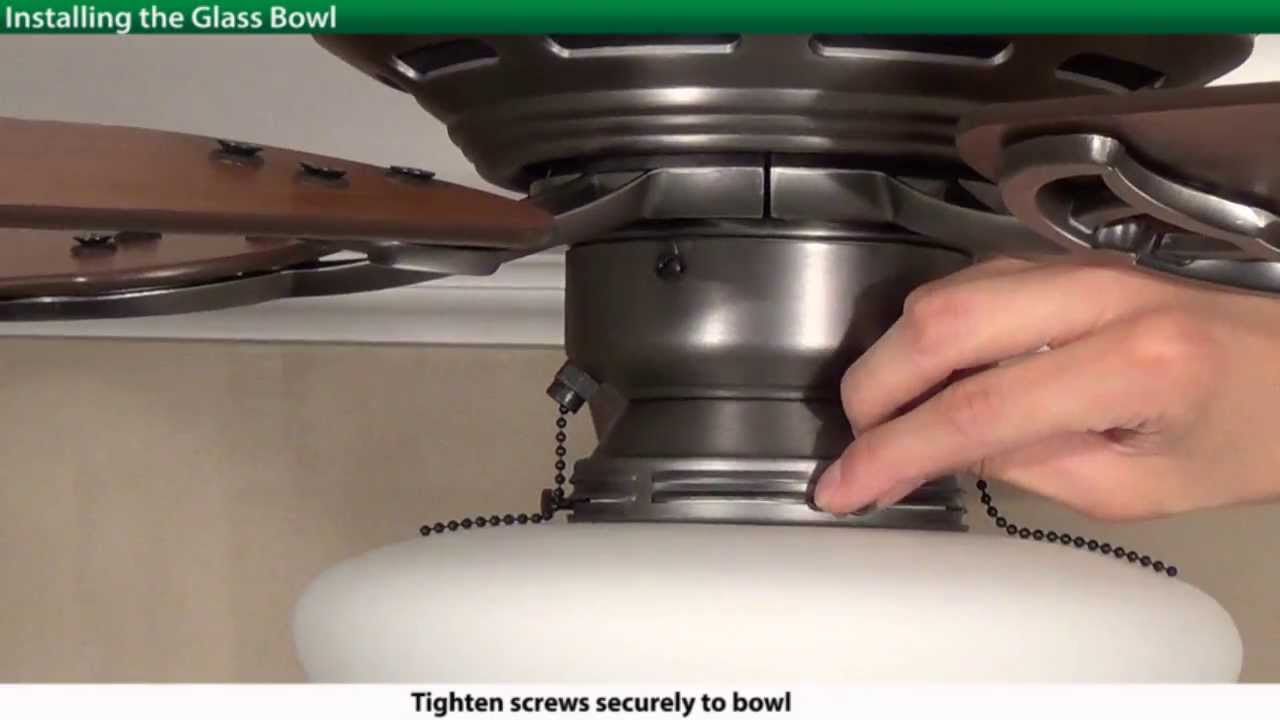
Once these wires are securely connected, push them into the junction box. Restore power from the panel then test lights and fan. Loosen the thumbscrews on light kit and thread glass shade, then tighten the thumbscrew. Follow the manufacturer's specific instructions to install a light kit onto the ceiling fan, and secure the ceiling fan assembly to the ceiling mount bracket. A ceiling fan light kit.
Ceiling Fan Light Kit Installation How To from homefixated.com The fan's white motor wire connects with the white, or neutral, supply wire. Connect the red wire in the ceiling to the black wire in the light kit and the black wire in the ceiling to the black wire in the fan. Otherwise, remove the ceiling fan and place on a tabletop to install the light kit. Once the cover plate is removed, it provides a connection for the light kit. Connect the female plug from the light kit housing to the male plug from the motor housing twist on the light housing to the fan assembly and tighten screws. Loosen the two screws in the collar on top of the motor. If the swag kit does not have the wire already threaded through the chain, you will have to manually do it. Assemble the ceiling fan as per the instructions that came from the manufacturer.
Restore power to the ceiling fan.
· to reduce the risk of electrical shock, install this light kit only on listed hunter ceiling fans type a through z. Once these wires are securely connected, push them into the junction box. 52 in 5 blade ceiling fan with light kit and remote control. Then remove the finial (c), finial cap (b), nut (g) and rubber washer (f) from the light kit (a). The adapter for our recessed light conversion kit for ceiling fans is easy to install, but if you need additional installation instruction, check out our videos and installation manuals. This wiring diagram illustrates the connections for a ceiling fan and light with two switches, a speed controller for the fan and a dimmer for the lights. The fan's white motor wire connects with the white, or neutral, supply wire. Install dummy terminal to end of each of the two wires in the switch housing. Remove the switch housing cover plate from the fan, and remove the plug from the center of the plate. Unscrew any screws in this area and pull off any decorative plates or covers that are concealing light attachment points and wires. Connect the green wire to your household ground wire (copper/bare wire). Enjoy your new ceiling fan. This light is designed to complement the calera ceiling fan, but is compatible with most light kit adaptable ceiling fans.